One of the major things I’ve learned over the course of my grad scheme so far is how big of a difference one person can make in your career development. Whether that’s the one person who champions you at an interview, the one person who invites you to lunch and makes you feel welcome, or the one person who takes it upon themselves to show you the ropes. Today I want to talk a little bit about finding the last person on that list, a mentor.

A mentor is a completely invaluable resource when you’re just starting, and throughout your career. Having someone you can go to for guidance, and who will help steer you in the right direction can give you so much confidence and really help you develop. You will never know everything, especially if you’ve just started, which is why having a mentor who can either share their experience or act as a sounding board to help you find an answer is so so important.

I’ve had a few mentors through my rotations, some have worked better for me than others. I’ve learned that a good mentor has to be someone you can trust and speak openly with, who you get on with, who actively wants to be involved in helping you develop, and who has enough life and business experience that they can help you grow in more than one way. Now what that person looks like for everyone will be different, and perhaps some of the mentors I’ve loved wouldn’t be right for you and vice versa. It might take a little bit of time, and maybes finding what doesn’t work, until you find someone to guide you, but that’s pretty normal.

So how do you find this mentor?

In some cases, you might be assigned a mentor, which can be a great thing. But even if you’re assigned a mentor, you’re not limited to only turning to that person for advice. What has worked for me is looking to the people who are a few rungs higher than me in jobs I would like to be doing. If you’ve worked with them on a project, and like their style, even better. Then I’ve asked to pick their brains on something, often over coffee, and seen how we get on. I will say that this has been made much easy by the fact that I’m on a grad scheme and I’m kind of expected to reach out to people and try and learn about what they do. The best mentors I’ve had this discussion has happened pretty much unprompted though, once we’ve got chatting, and I’ve asked a few questions, they’ve been more than happy to share their wisdom. Look for people who want to get you involved in projects (or lunch) and are excited about their job and you can’t go far wrong.

Once you’ve found your mentor, here are a few ideas of things you should be working with them on or asking about:

  • Most importantly, how can you improve? What does good look like in your industry?
  • Where can you skill up?
  • Where do they see your business going (if they’re high up enough) or where they see the industry going? It’s useful to know what the future might hold so you can be ready for it
  • What projects can you get involved in?
  • How should you approach salaries and negotiations?
  • How did they deal with any problems you’re facing now when they were starting?
  • How to branch out and make yourself more employable and rounded
  • Any advice they have for dealing with certain people, or ways of working in your office
  • What has their career path been like?
  • Help with working on your soft skills like people management
  • Ask them to take you along to meetings that are a little above your grade where possible to see what those higher-level conversations sound like
  • How can you help them? Make sure you’re giving back too

So, in short, find yourself a mentor and make the most of them by asking all of the questions. Do you have any mentorship advice? Have you had any great mentors? Awful ones?

I’ve been sharing a pattern every Wednesday over on my Instagram and I’ve bene having so much fun creating them, that I thought I’d share two ways of creating a repeating pattern with you guys to share the love. Creating a professional looking, repeating pattern is surprisingly easy when you use these two techniques.

But for this I really wanted to push myself to create something a bit more complex than usual, so I took some inspiration from one of my favourite artists and designers of all time, William Morris. I love the way that all of his patterns flow together and seem to interweave so intricately. There’s something a little bit magical about seeing his process sketches – I would highly recommend you take a trip out to the William Morris Gallery or at least the top floor of the V&A if you’re ever in London to see them. They’re so magical in fact that I thought creating something similar was completely out of my reach. But, with a little bit of work, I feel like I’ve been able to create something which, even if I’m still learning, takes a lot of inspiration from the patterns I love.

All you will need to do these really is a pencil, a ruler, some paper, and some kind of image editing software e.g. Affinity Designer. But, if you’re not confident designing on the computer you might also want to have some scissors, and colouring pencils or paint nearby.

METHOD 1

This method is the one that I’ve used the longest, and the most frequently. It’s really simple and doesn’t really require any forward planning. It works best for patterns with separate illustrated elements, but you can also use it for more interwoven patterns.

1. I usually work completely digitally for this method, so the process images are screenshots, but I have added in notes if you want to work physically.For this method you’re going to want to start with a square, whether you’re working on a piece of paper or on the computer. I’m pretty sure you could do this with a rectangle too, but I always like working with a square

2. Then just draw whatever you want to be in your pattern. I went with some naked ladies because I was feeling sassy. The only rule here is don’t touch the edges of your square – I put some guidelines in to remind me, but you don’t need to.

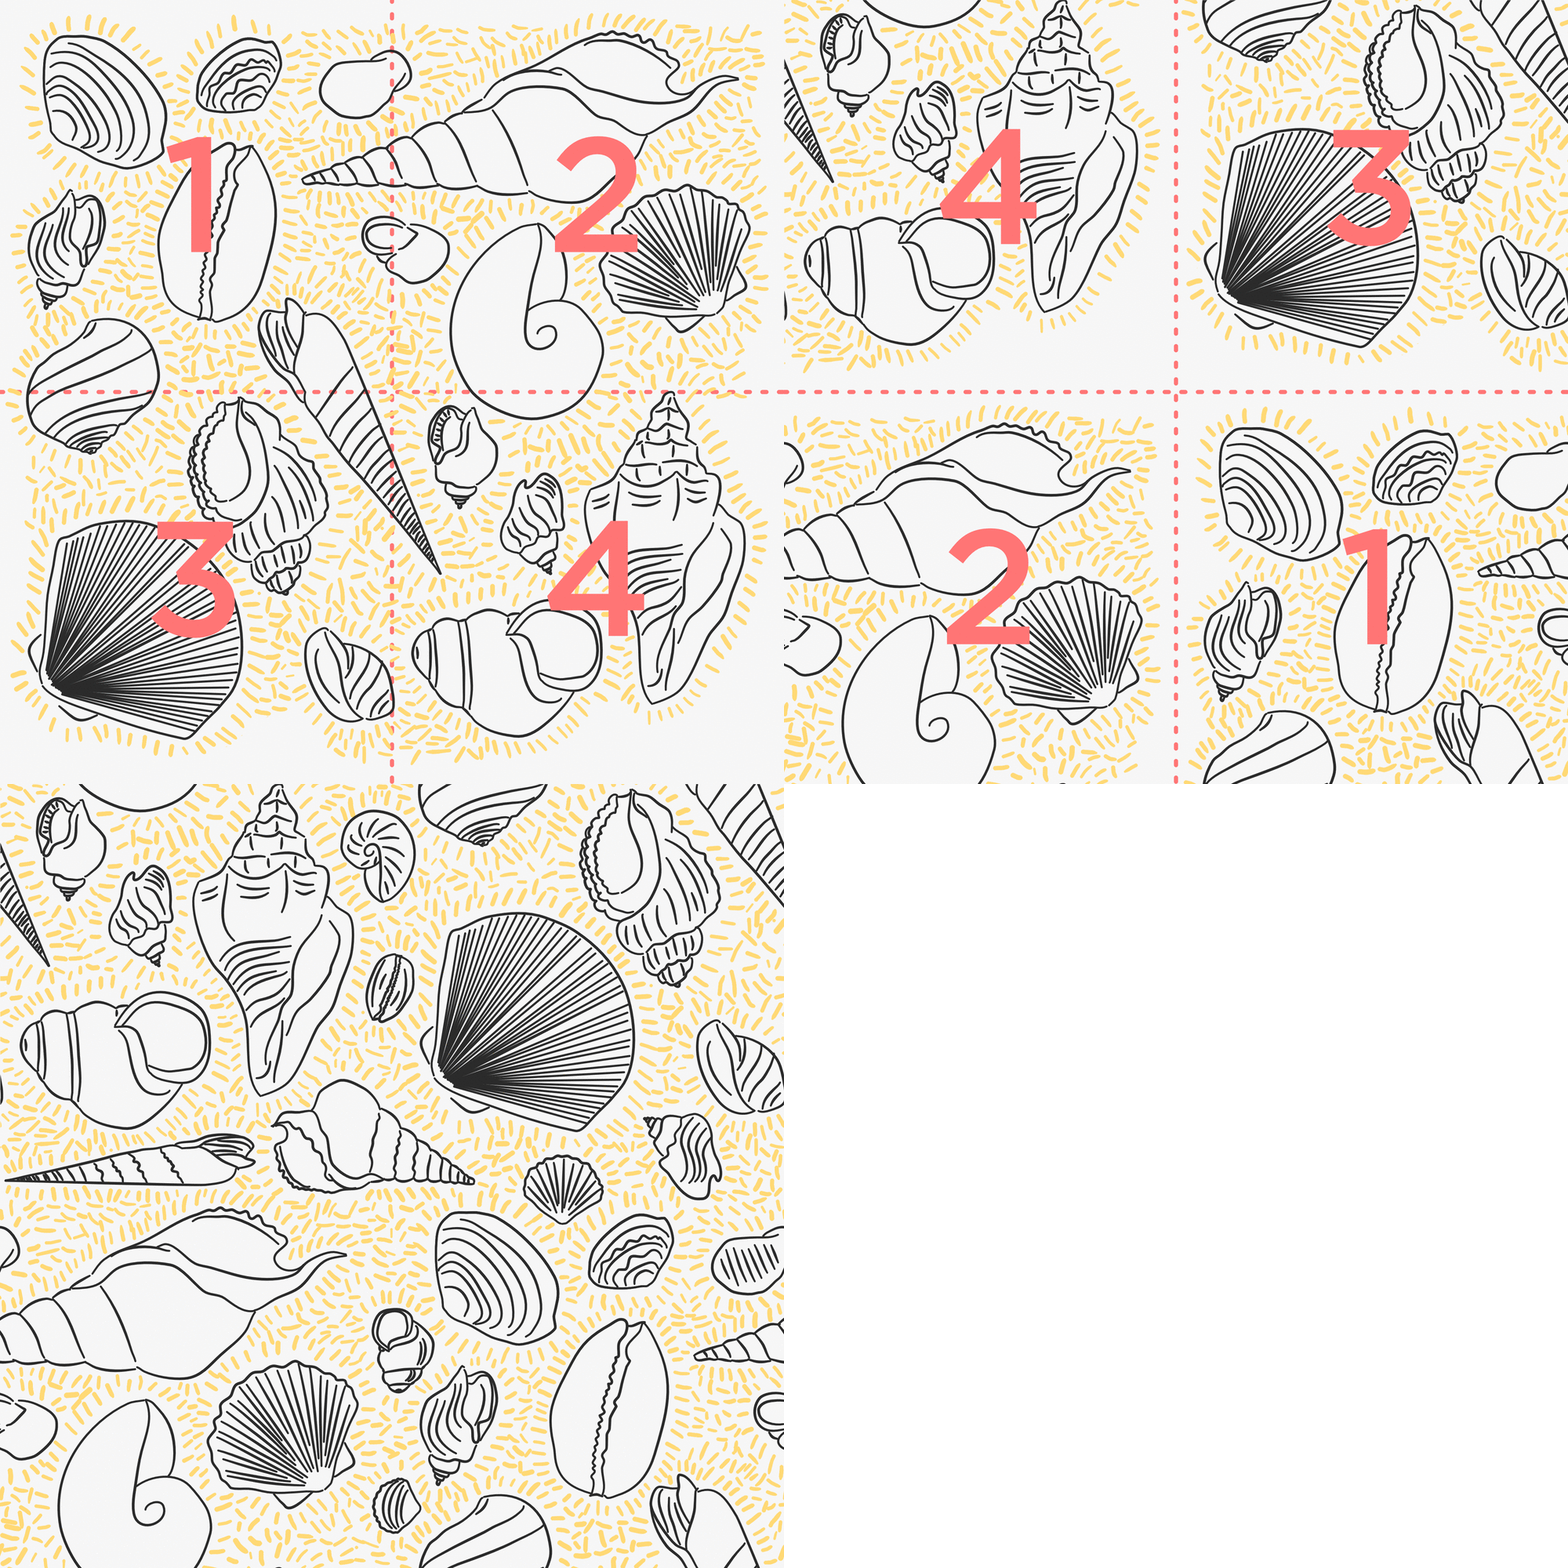
3. Once you’ve filled in the middle of your square, you want to divide it up into quarters. So, if you’re working on paper you’re going to need to carefully cut your drawing.

4. Now you’ve got 4 little squares, you need to rearrange them so that the top left square becomes the bottom right, the top right becomes the bottom left, the bottom left becomes the top right, and the bottom right becomes the top left. Then you need to stick it together to make one big square again. If you’re working on paper, but the sticky tape on the back of the paper because you’re going to need to do some more drawing.

5. Because of how you’ve rearranged the squares, you should now have a bit of space in the middle and across the joins of your square. You’re going to want to fill in those spaces with some more of your illustrations, so that the full square is evenly covered.

6. Now you have a finished pattern tile! You can now repeat your pattern, by copying the square and putting them together, over and over again. If you’ve been working on paper, you’re probably going to want to scan your tile in, and then edit it digitally so you can reproduce it more easily.

And there you have it, a repeating pattern that you can print onto pretty much anything!

METHOD 2

This is my William Morris inspired method. It requires a bit more planning, and, for me redrafting. Fun fact, William Morris didn’t like to redraft his patterns, he thought any design worth its salt could be made and coloured in one single draft. We disagree on this. Because this method requires mirroring of tiles, it doesn’t work as well for illustrated elements like characters who mightn’t look as good flipped. Instead it’s best for more interwoven patterns featuring more abstract or simple natural elements, here I have used leaves and more natural elements taking further inspiration from Morris.

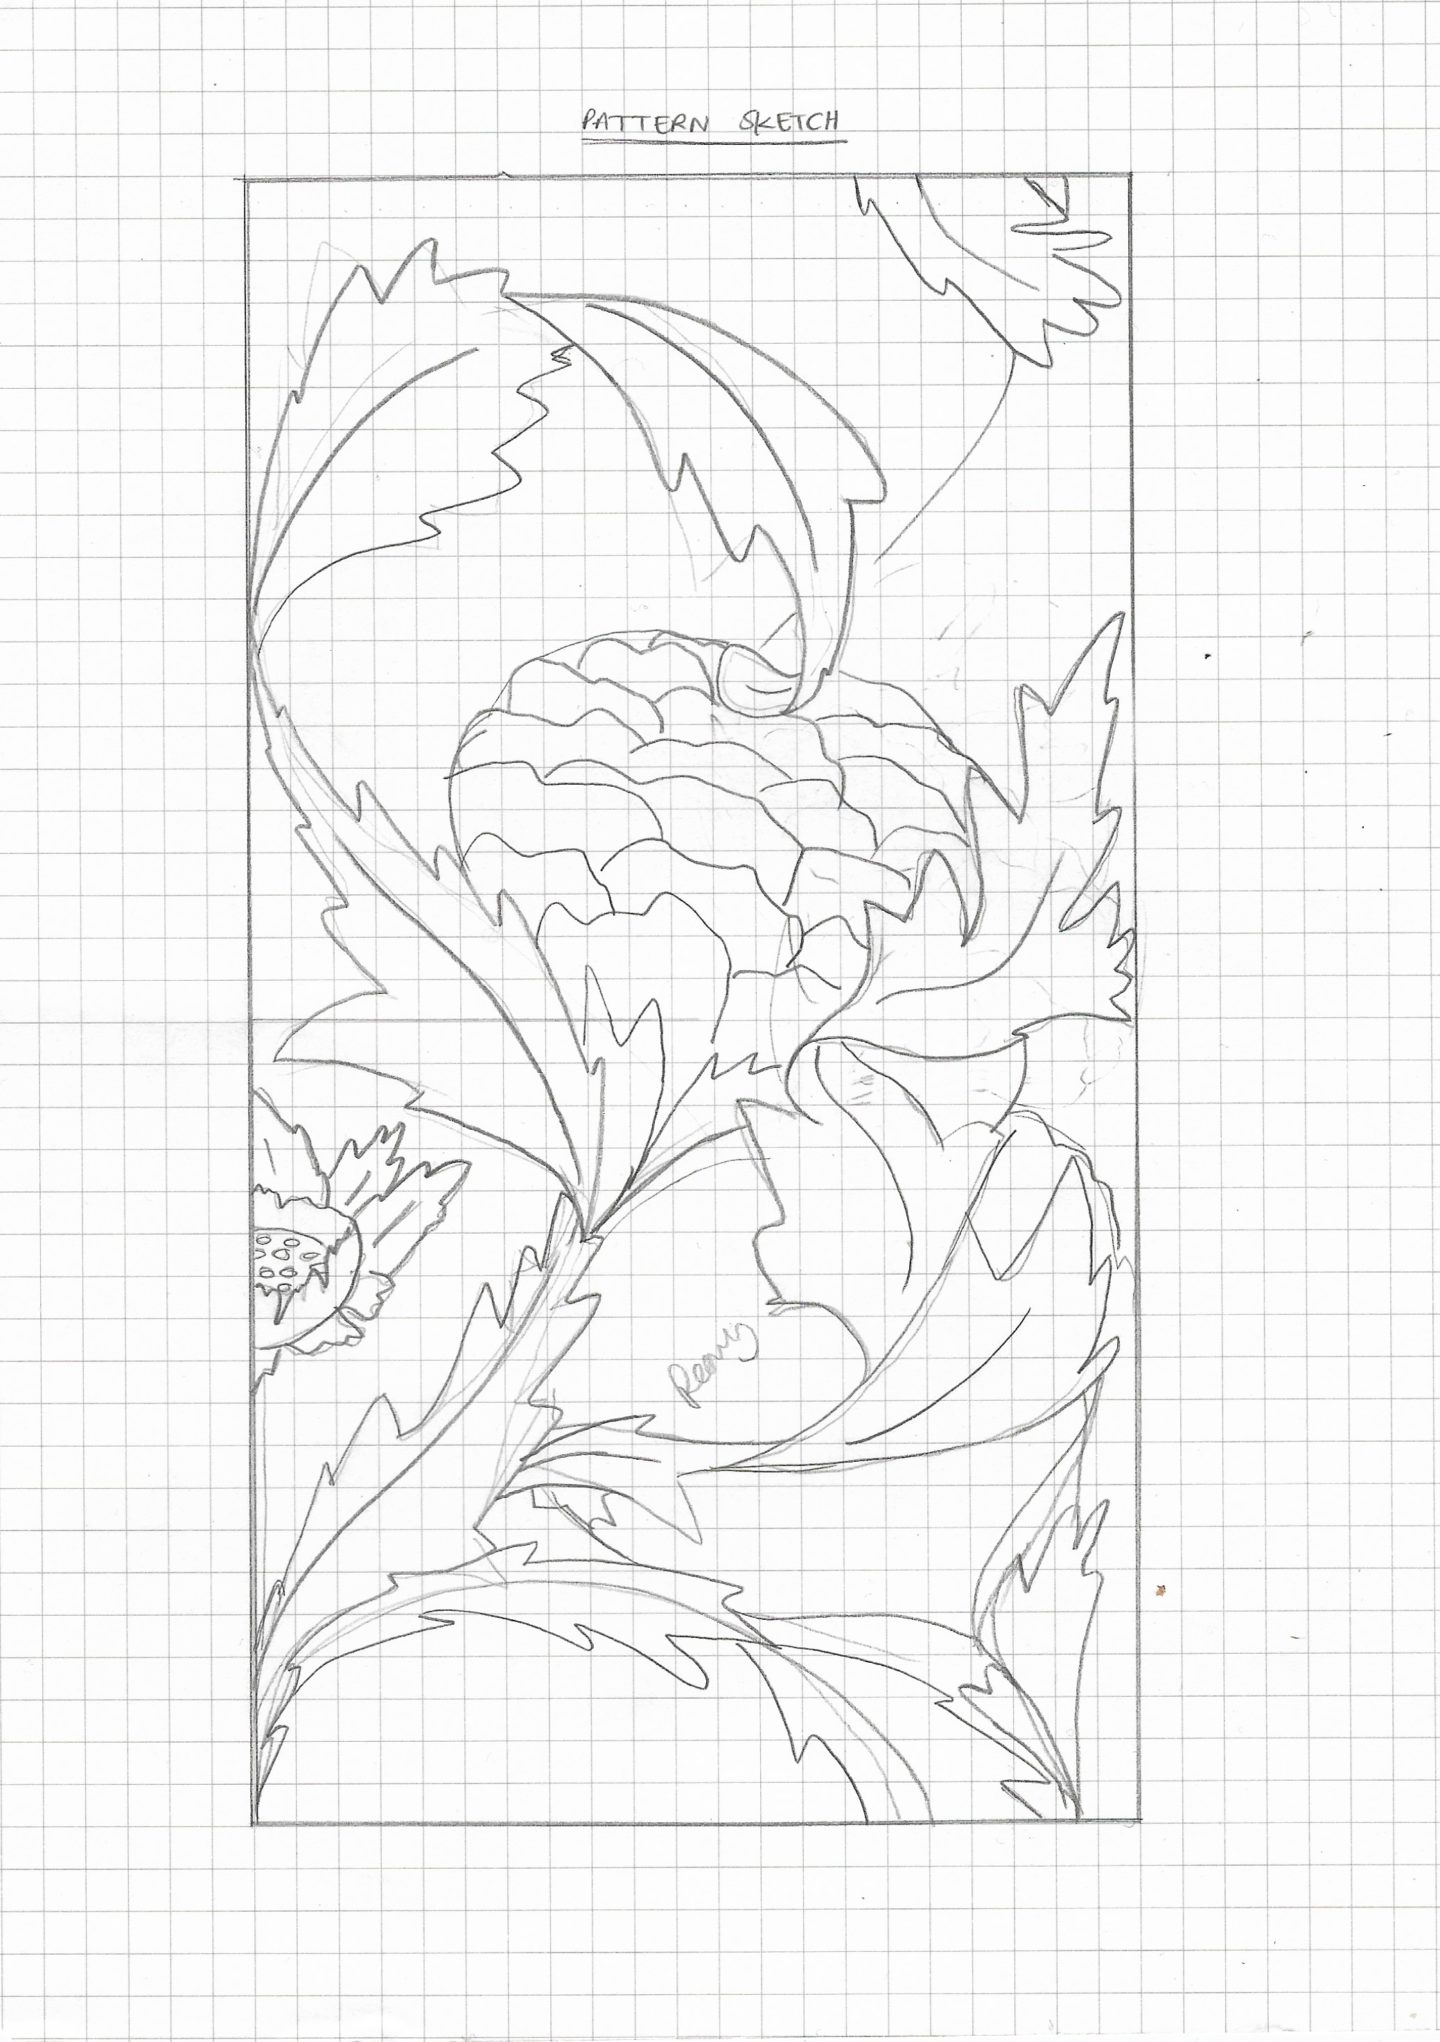
1. Method 2 works best if you start with a rectangle. Personally, I like to draft on paper, and overlay a grid onto my initial sketch because it helps me visualise where parts will join up an keeps my design neat.

2. Then you want to sketch out your design. I begin with just drawing out the structure of my design using curves and lines to show where I want elements to go and how I want the pattern to flow across the tile. You really want to create a sense of movement across the tile. Unlike the first method, you want to go right to the edges, and into all of the corners.

3. Once you have your layout you’re going to want to refine (and colour) your design. I normally do this using Affinity Designer, but you could certainly do this on your physical page still. As my sketches are quite messy, if I was working on paper I would transfer my design onto a fresh sheet using some tracing paper.

4. Now you have your first pattern tile, you want to duplicate and flip your image 180 degrees, then place them together. This is best done digitally, so if you’ve been working on paper up until now you’re going to want to have scanned and cleaned up your design.


5. Then take your two tiles together and flip them vertically, if you have an element that only works one way up e.g. a bird you can skip this stage, to create a master tile made up of 4 of your original design.

6. Once you have that master tile you can check to see if there’s anything you want to change or refine. It’s also worth trying your design rotated at this stage too, so you can see which way round it looks the best.

When you’re happy, get repeating!

The time is almost here, I am almost ready to finish my time being on a grad scheme and get a proper job. This year has been filled with learning, mainly through trial and error. The big thing I’ve learned, through the process of 4 placements, is how to get the most out of a grad scheme. Unfortunately for me, as I don’t intend to be a grad for the rest of my life, this isn’t so useful. Fortunately for you, I’m sharing all the things I learned the hard way so you don’t have to and so some of the stuff I went through this year doesn’t go to waste. It’s also a bit of a bumper edition of my internships post, so it’s probably worth a read if you’re a grad, an intern, an apprentice, or just a new starter. This list is a mixture of things I did and that really helped and things that I wish I had done now that I’m looking back over the year.

ASK QUESTIONS

You’ll get told this one endlessly by whoever is running your grad scheme, but it’s the biggy. Ask questions when you don’t understand something, you are in the wonderful position where there truly are no stupid questions. Ask questions about the future, about people’s opinions, about the work, about the business. Ask loads of questions.

REACH OUT

People love feeling admired, fact. So, make some people feel admired by reaching out and asking them to tell you about themselves and what they do. As a grad, you have a bit of extra license to get in touch with anyone, and I mean anyone, I’ve had this kind of chat with everyone from new starters to CEOs and I have learned so much.

LEARN THE BASICS

There are some fundamental skills you need in any job, don’t skip them, even if you’re given the chance to do so. Knowing how to book a meeting room, whoever/wherever you are will come in handy at some point.

MAKE FRIENDS, NOT JUST CONTACTS

Something new starters are told to do is network, and network hard. This is undoubtedly useful. But what’s way better is to make friends rather than just contacts. Putting the effort in to get to know people a little better will pay off dividends, whether that’s just in having a friendly face about, getting the latest business news, or having contacts you can still talk to if you, or they, move on.

FIND YOUR SUPPORT NETWORK

As well as making friends, you also need to find the helpers. These might be the same people. But make sure you know who you can turn to for advice, or for help if you’re in a sticky situation, and stay close to those people. For me, these ranged from colleagues to HR managers, to my fellow grads.

PUSH FOR WORK

There are going to be times (maybes lots of them) where you feel invisible, where no one is giving you work. This when you need to get a little bit pushy and start asking to get involved. Walk over to someone you like and see if there’s anything you can help them with, even if there isn’t I guarantee one of the five people who overheard will be happy to have an extra pair of hands. I wish I had done this more.

ADD VALUE

When you do get that work add some value. Put a little bit extra into whatever you do. Whether that’s colour coding your excel, adding a summary in the front of the doc or in the email you send, or adding your own opinion and recommendation at the end. Add some value, and people will start to see yours way more.

BE ENTHUSIASTIC (EVEN WHEN YOU DON’T FEEL LIKE IT)

This one is tough, especially when you’re in your third placement doing something you don’t like so much and you’re fed up with being new (okay maybes that was just me). But you need to fake it if you aren’t feeling super enthused. As a grad, everyone expects a baseline of excitement from you just at the prospect of learning, and you need to live up to that standard if not exceed it. As much as it sometimes pains me, the more enthusiastic about the work you are, the more engaged you’ll be, and the more you’ll end up enjoying it, even if you were faking it at the start.

GET IN EARLY

Or stay late – I’m just a get in early person. Show you’re willing to put the hours in.

DOUBLE CHECK WHAT YOU NEED TO DO

This is something else I wish I had done more at the start. Double check what people want whenever they set you a task, and check how they’d like it sent over – do they just want an email, or it putting in a folder, would they rather talk it through? This is the best way to make sure you’re doing useful work and that you don’t have to do things twice.

GET SOME OBJECTIVES

For a lot of my placements, I didn’t have objectives. This was a mistake. Even if you don’t get some handed to you, you should sort out some objectives. Those can be learning or doing (or both) things you want to achieve over your time. They give you something to work for, and they can also shape your time. So, get some objectives, then share them with your line manager/mentor so they can help you achieve them.

DO YOUR RESEARCH

If any of your placements are anything like mine, you’ll be asked what you want to get out of your placement and what you’d like to do (no guarantee you get to do it but it’s nice to ask). There’s always the obvious of you want to learn and try out as much as you can – highly recommended. But it’s also useful to have an idea of what the company does and what you’re interested in. That could be working with a certain client, shadowing a certain person, learning a certain skill, or just trying out a new role.

TRY AS MANY THINGS AS YOU CAN

This is pretty obvious, but you’re in a grad scheme to learn so try out as much as you possibly can. I’m talking different roles, different ways of working, different skills, different groups. Just pack in as many experiences as you can, even if you have to learn how to play softball.

MAKE NOTES

This one has two parts. First, write everything down when you’re working so you can provide good meeting summaries and just do good work. Second, write down everything you do and everything you feel about the job as you go. This will be absolutely invaluable in the future. It’s easy to look back on things with rose tinted glasses or to focus on that one thing that went wrong on your last day rather than the overall experience. Having those records to refer to will help give you a truer picture of your own experience, so you know what works for you. Plus, having a record of everything you did and learned is so useful when you’re applying for more jobs and you need to give examples in interviews or on application forms.

KEEP A LIST OF WORDS YOU DON’T KNOW

Write down every word or acronym you don’t know, then ask (or google) what it means. By the end of if you’ll have a work glossary that means you are more likely to have some semblance of an idea as to what is going on.

SORT OUT YOUR DESK SET-UP

By the way the world is going, you are going to be working at a desk until you’re 102. So, make sure you set up your desk properly wherever you are. Setting my seat to the right height has changed my life. If you’re moving around a lot, get yourself a little tray to keep your papers in. It will make it so much easier to gather up your stuff and carry it over to wherever you’re going next. They’re also great for storing the fruit you accumulate from the canteen.

STICK TOGETHER

If you’re coming into a business as a graduate, more likely than not you’ll be coming in with a little gang. In mine, there were four of us. Stick together. Share what you’ve learned. Bitch about your problems as a group. Stay close to those people because they know what you’re going through, and they’re probably going to be super useful at some point – especially if you don’t manage to get around to learning how to book a meeting room (seriously, don’t be that person).

SAY YES AS OFTEN AS POSSIBLE

Have you got five minutes? Yes. Could you help me out on this project? Yes. Do you want to grab a coffee? Yes. Do you want to be involved in some new business? Yes. Do you want me to show you how to write SQL code? Yes. Would you like a drink? Yes please.

BUT DON’T BE AFRAID TO SAY NO

As much as you should say yes to as much as you can, don’t forget you can say no. If you have loads on and you can’t complete a piece of work well, say so at the start. Also, if you don’t want to go to drinks, you don’t have to.

READ WIDELY

There are going to be quiet moments in your job. Use those to research your industry, or things that are tangentially linked to what you’re doing or clients you have. Then share what you’ve found if it’s useful. This is the second best way (the first is cake) to make friends with colleagues.

BRING YOUR OWN SKILLS AND OPINIONS

You’re on whatever grad scheme you’re on for a reason. You have a unique set of skills and experiences. Don’t be afraid to make them a part of your work, and to put your own spin on things as long as you’re still ticking the major points you need to.

SPEAK UP

On that point, make sure your opinions (or just questions) are heard in meetings. You are just as bright and able to come up with ideas as anyone else.

UNDERSTAND IT’S NOT GOING TO BE WHAT YOU IMAGINED

No grad scheme lives up to the hype, not one. That’s not to say they’re bad. But they’re jobs. Sometimes they’re boring. Sometimes they’re stressful. Sometimes they don’t feature the things you want. Sometimes you’ll meet people you don’t much like. It’s not going to be the wonderful world you imagined, but it is going to be filled with opportunities. Don’t be disheartened, just make the most of it.

REMEMBER EVERYONE IS MAKING IT UP AS THEY GO ALONG

There are going to be times when you have to blag it. In these moments, its useful to know that everyone, no matter how senior, has to make it up as they go along at some point (probably more often than you think). So, don’t worry about it. You’re learning. They’re learning. Ask for help if you need it, you’re allowed to not know!

BRING YOUR OWN LUNCH

You are not going to be paid much (it’s like a working masters) so it just makes sense.

In my quest to share everything I’ve learned in recent months, I thought I’d do a little (this ended up being not quite so little) piece on making a creative CV. One of the few things I am remembered for in my office building is my CV, and it’s something that has been mentioned in every interview I’ve taken it to. So, I know first-hand the power of a well-designed CV to make you memorable, and more specifically memorable for the right reasons. This has been in advertising agencies, data analytics firms, PR companies, art festivals, and even temping jobs – before you think that creative CVs are only for “creative” jobs.

Whatever you’re applying to do, you want to stand out, and a creative CV is a great way to do that.

There are a whole load of examples out there, some good, some bad, but there aren’t many tutorials on how to do it. So, I thought I’d share an outline of my process, which is super-duper simple. If you’d like more of a tutorial of how I practically put mine together – let me know and I’ll be sure to make one soon. I’m also thinking of sharing a bit of a guide to creative job applications too.

So, without further ado, here’s my process in the form of a few questions I asked myself.

PROCESS

WHAT DO YOU WANT TO SAY?

Start with what you want to say. What are your main selling points or your most impressive experiences? How can you show them off? This is the key to a great CV. I started by writing out all of my information, curating it, then trying to make it compelling in a regular CV format. If you can make yourself look good in plain Times New Roman, anything else you add will just be a bonus.

WHAT IS THE BEST WAY TO SAY IT?

Once you know what to say, you can then think about the best way to visually present it. First off have a sketch of what you think you can do or any ideas you have. Then have a look on Pinterest (I have a whole board of ideas here) and see what other people have done with similar information, see what works and what doesn’t, then adapt it to make something that suits you.

CAN YOU MAKE IT SIMPLER?

Get your ideas together, then ask yourself one question: can I make it simpler? This is the point where you want to cut out anything unnecessary, whether that’s content (do recruiters really care if you like long walks on the beach?) or a visual element (does that 6th graph really add anything to what you’re trying to say). The simpler and easier to access it is the better.

HOW CAN YOU MAKE IT FLEXIBLE?

If you’ve simplified really well, you’ll probably have this sorted. But you want your CV to be able to flex and change as you apply to different jobs. Going through this process every time would be so frustrating. What this basically means is don’t lock content that will have to change a lot – your who you are statement, or past experiences into a format you can’t edit or that will only suit one job.

OH, SO I’VE GOT TO MAKE IT NOW?

Put it all together. I made mine in Affinity Designer. While I would highly recommend you try it out, or use a design programme for the best results, you can still make some really great, visually compelling stuff in word processing programmes. Just make sure you export it as a pdf before you send it to anyone to avoid elements moving around or not rendering properly.

DOES IT WORK?

Give it to a friend or colleague and see what they think. An extra pair of eyes will help you find out if what you’re saying is clear, and help fish out any sneaky typos. NB: if you’re too embarrassed to share your CV with a friend, you need to do some more work on it – if it’s not good enough for someone who already likes you, why would it be good enough to sell you to someone who doesn’t?


COMMON MISTAKES

IT’S OVERLY COMPLEX

It’s easy to get over-excited by the visual stuff, but when it comes to CVs less is definitely more. Any graphic elements you use should make getting to the information easier, not harder. So, don’t overwhelm whoever has to read your CV, instead look to help them to see the best in you.

THEY FORGET THE CONTENT

I see a lot of creative CVs on Pinterest that look absolutely stunning but have absolutely no substance, or even space to add it in. Content is king in all things, but especially your CV. Sure having a really cool infographic is going to catch a recruiter’s eye, but if you don’t have anything that actually tells them who you are, what you’ve done, and why you’d be a good fit there’s no way they’re going to hire you. Start with making the content relevant then get creative about showing it off, not the other way around.

IT’S TOO LONG

I have honestly seen 5 pages CVs at work. No one, and I really mean this, no one needs a 5-page CV. You should be able to fit everything you need to say on one, double-sided, page. Curate your best bits, and don’t waffle. If your CV is the same size as a small novel, it’s not going to be read.

IT DOESN’T MATCH WHO THEY ARE

As I said earlier, your CV is there to show you off. So, it’s vital that if you’re going to get creative with your layout or use some more visual elements, they have to fit with who you are and what you want to say. If you’re a serious management consultant you might not want fun hand-drawn illustrations down the side, but some graphs might work better. Equally, if you’re going to work in social media, it might not make sense to have something that feels more old-fashioned and features beautiful calligraphy, instead, you might want to play with colour and emojis. Again, start with who you are then look to present that, don’t start with a style you like the look of then try to fit into it.

AN EXAMPLE: MY OLD CV

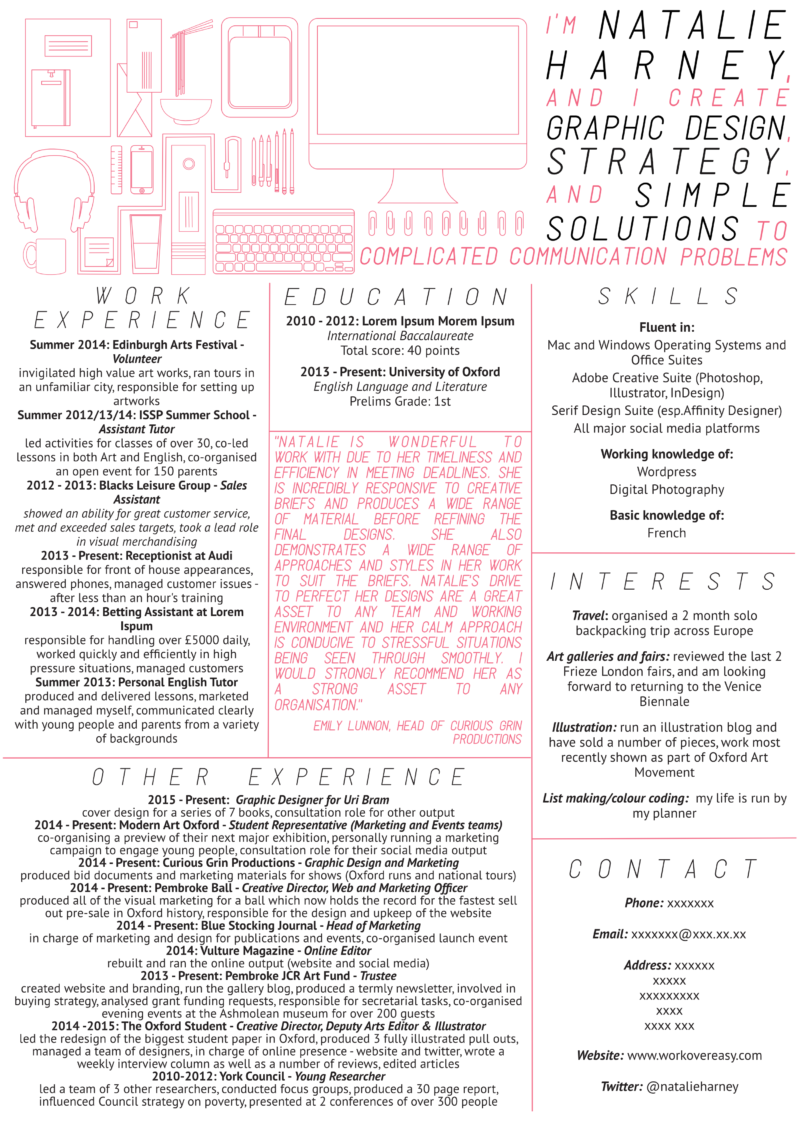
I started this off by talking about my own CV, so I thought I should share it with you. This is really quite old now (2014, I was 18), I couldn’t find a more modern version, but I have used this format for every CV since.

Why does it work?

  • It fits on a single side of A4 so it’s easy to skim
  • I used it to apply to a grad scheme with a number of different businesses (from events to creative agencies, to data) so it isn’t geared towards a specific industry
  • The layout is unusual but still easy to navigate
  • The top section adds character and is memorable, without detracting from the content
  • The pop of colour makes it eye catching
  • It’s all about the content inside the boxes (which I have edited out in some instances for privacy)

Admittedly, I’m not very good at getting negative feedback. I tend to take it completely to heart and spend a while feeling pretty bad about it. In part because I tend to care a lot about whatever I’m working on, and in part because I just haven’t practised getting the most out of constructive criticism. Or, at least that was the case. At the end of my last graduate placement, I got some negative feedback that, while it stung a bit and I probably hung on to it for too long, gave me lots of things I could work on and I think that I have actually made the most of it in the end. So, this is my guide to not (just) feeling bad (I still definitely feel bad – even about the example I’m using) but instead getting better.

THINK ABOUT THE CONTEXT

Understanding who is giving you feedback, why they’re doing it, and what they’re looking to get out of you, can change how you view what you’re being told. Is this someone you trust? How much of your work have they seen? Is it an end of project review where you’ll get more rounded feedback, or on part way through where you’re looking for tactical improvements? Are they invested in you getting better (if they’re your boss they probably are)? Are you been given feedback against an agreed set of objectives, or are these just the things that have stood out to them?

Also, have a think about your own context. If you didn’t do as well as you thought, was there something else going on at the time, what outside factors had an effect on your performance. For example, the feedback that inspired me to write this was all about a time where I was suffering quite badly from anxiety. Realising that helped me be kinder to myself, but also to realise that I needed to be more proactive in finding a solution to that outside issue, and perhaps even make those I work with aware of it.

LISTEN, THEN RESPOND

Especially if you’re intending to have a continuing working relationship with the person who’s giving you feedback making sure you respond thoughtfully is absolutely key. The most important part of this is actually listening and understanding what they’re saying to you. Try and see it from their point of view. For example, one piece of feedback I got was while I did my work well and in good time, the lady I was working for would have preferred we had a more collaborative relationship rather than me emailing work over. She had written on emails where she had sent me work “if you have any questions please come over and discuss them with me” or something along those lines. To her that had seemed like a very clear invitation for collaboration, especially as that’s the kind of environment she’s used to working in, and I recognise now that I probably missed out on an opportunity to discuss my work with her. However, when she brought this up I also explained that the comments she had sent, to me had come across as offers for help if I didn’t understand the brief initially and that I hadn’t been aware that she had wanted to discuss my work more as she never asked about it afterwards. That way, I took on board what was being said and recognised why I was getting the feedback, but also explained why I had acted the way I had because I felt it was important she didn’t think I was avoiding talking to her. We both came out of it with a better understanding of how we can work together better.

ASK FOR WAYS TO IMPROVE

If someone gives you feedback, and you’re not sure what to do with it, ask! Ask them how you might go about improving, or if there’s one practical thing you can do in the next week to solve the problem. This is just good practice for all feedback sessions, but I think it’s probably most important when you get critical feedback because it makes it much easier for you to put together an action plan and actually get better.

WORK OUT TANGIBLE ACTION POINTS

The thing that has made the biggest difference for me, is making sure I come away from a feedback session with actionable improvements. That means making a plan there and then with more concrete ideas than just ‘get better at talking about your work’. If you can come away from a feedback session with 3 things you can actually do, right now, to get better it will put you in a much more positive frame of mind. Taking the same example of feedback as in the listen and respond section, the main action point I came up with was to ask if someone wanted to go through my work whenever I sent it over, as a way to get around the confusion. I also realised that my not discussing my work more had given the overall impression that I was closed off and not willing to collaborate, so I took it upon myself to lead a show and tell session in my next placement. Then finally, I decided to replace 3 emails a day by getting up and walking over to someone’s desk to physically ask them the question or arrange a meeting. Having something to work on left me feeling empowered rather than hurt (I was still a bit hurt, I’m only human) and it hopefully means I won’t get the same feedback again, instead I’ll get new things to work on.

UNDERSTAND THAT YOU’RE LEARNING

As ever, I’m closing one of these posts with a be kinder to yourself message. But you should always be kinder to yourself. It’s easy to get caught up in always wanting to do well and be good at everything (no shame in that). We’re a generation that’s very good at curating our lives, and outwardly projecting only the finished best bits we want people to see. So, when you get negative feedback you can be left feeling vulnerable, or like you’ve failed. But negative feedback is an important step on the road to getting better and you have to be bad at something at some point. Don’t forget that you’re learning, and don’t forget all feedback will help you with that. 

Do you have any advice for dealing with negative feedback? Is there any that you’re working on to improve right now too?